Chapter 11 - Security 4.0
SECURITY
halFILE provides multi-level security that includes:
- Restricting users from accessing selected image databases
- Restricting users to certain actions such as scan, index, archive, search
- Password control
- System Administrator identification
Security Set Up
To set up security, select Configure-Security and click the Enable Security sub-menu in the Administrator. This places a check mark on the sub-menu and tells the system that system security is enabled. If you click this sub-menu when it is checked, the security system is disabled and the check mark is removed.
Immediately after enabling security, you must define at least one user with System Administrator privileges. This will prevent you from being locked out of the system.
Security is based around users. When security is enabled, a user must provide a user id and a password to gain access to the system. Once he gets into the system, the databases that can be accessed and the features that can be performed depend on his user profile.
At least one user must be set up as a 'System Administrator'. The System Administrator is the only person who can turn security on/off and define user profiles. When passwords are entered, the data is replaced with asterisks on the screen to prevent others from viewing a user's personal password. This is also true when the System Administrator defines user passwords. Therefore, if a user forgets his/her password and the System Administrator does not have a record of the password, the System Administrator would have to remove the user from the system, then re-add the user to set up a new password.
If you are locked out of the system because you do not know a password, call Technical Support.
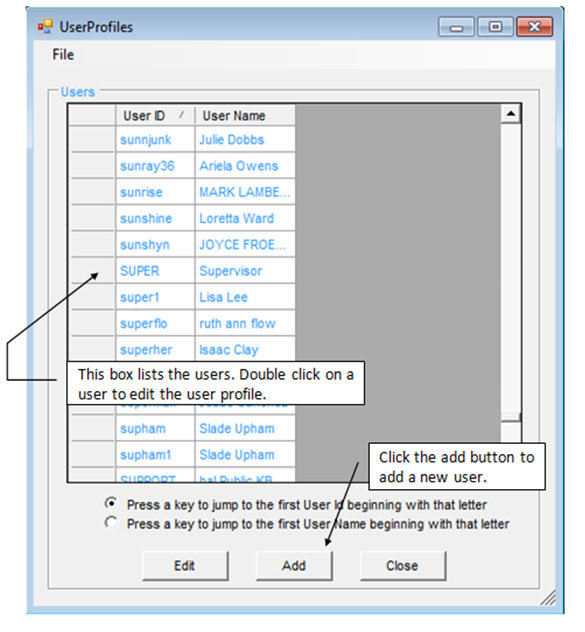
To set up users and designate restrictions and privileges, select Configure-Security-User Profiles. This displays a screen similar to the following.
Adding a new user
- Click the add button to display the user profile screen.
- The left box shows all the databases that have been defined, consisting of an application id plus the document type. The frame at the bottom of the screen shows the global privileges the user is allowed to perform (scan, index, search, set up, archive, system administrator, all databases).
- Click on the privilege buttons that you wish the user to perform. If you click the all databases button, then you do not need to select databases for the user. The user is automatically given rights to perform the selected global privileges for all databases.
- If the all databases button is not selected, you must add the databases the user can access into the right-hand box. To do this, double-click a database in the left-hand box or click a database in the left-hand box and press the Add button. This adds the database to the user's list and gives the user the default, global privileges for that database.
- To set particular privileges for a database, double click the database in the right-hand (user's) box. shows a form for specify user privileges for that database. In this way, you can give a user rights to index and search in one database, while allowing only search privileges in another.
Editing an existing user set up
- Double click the user id, or highlight the user and press the edit button.
- Set up the user's profile as describes under 'Adding a new user', above.
To remove a user, highlight the user and select File-Delete.
To close the user screen, select File-Close.
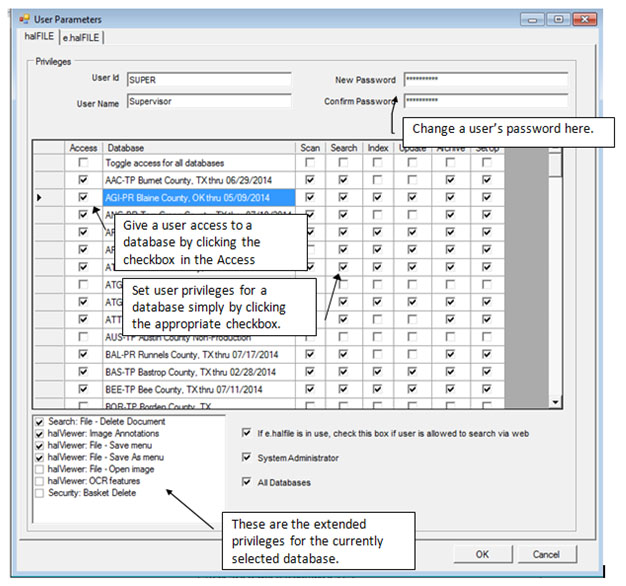
The following screen shows a user profile. This user has no database restrictions since the All Databases button in the User Privileges frame is turned on.
When you click a database in the grid, the extended settings for that user and database are updated in the box at the lower right corner of the screen. These settings enable/disable addition features for the user.
Document Level Security
Document Level Security defines what documents a group of users can view based on selection criteria against a database field. To set up Document Level Security, select the Configure-Security-Document Level menu in the Administrator. This displays the screen below. Examples of document level security include:
• Restricting access to sensitive information such as personnel records or documents that contain a social security number. • Restricting access to documents based on a certification date. If the document is after a specified certification date, users cannot view it. • Restricting access to certain instrument types in the database. If the document is a military discharge, for example, users cannot view it.
To set up Document Level Security, select the Configure-Security-Document Level menu in the Administrator. Select the Application and Database you want to define the security settings for then click New Profile and enter a phrase that describes the security setting. Then highlight that phrase and click NEXT to define the settings for this new security group. This displays the screen below.
Windows Active Directory Integration
Windows Active Directory is a powerful tool for maintaining network users across multiple servers and domains. halFILE and e.halFILE can be configured to integrate with Windows Active Directory. This lets you set up Windows Active Directory Groups containing users that have similar security properties in halFILE. Then in halFILE, you do not need to set up each individual user, only the groups that match the Windows Active Directory Groups. When you add a user to a Windows Active Directory group, that user automatically inherits the privileges of that group when going into halFILE. Furthermore, no login to halFILE is required. The user is automatically logged in under the network user id.
Why use Active Directory Integration?
- Administer users from one place, Windows Active Directory.
- No halFILE security setup is required when a new employee is hired that needs to use halFILE. Set up the person's network user id, put him in the appropriate Active Directory Groups and he should be able to get into halFILE with the correct security.
- Easy to remove users when employee turnover occurs. If an employee leaves, you delete him from Windows Active Directory and he/she no longer has access to halFILE.
- Quickly change halFILE roles for users. If a user is promoted to a new job requiring different halFILE privileges, then move the user from one Active Directory Group to another and those privileges automatically flow over to halFILE security.
Before you start
Before you enable the Active Directory Integration feature in halFILE, you should spend some time planning your groups. These groups will be used to assign User Privileges (Configure-Security-User Profiles), Custom Search Settings (File-Database Custom Search button) and User Features (get to User Parameters by double clicking a user in Configure-Security-User Profiles).
If you are enabling this feature on an existing site, you should define your Windows Active Directory groups and assign users to these groups.
halFILE Active Directory Integration Set Up Procedure
Set up a Windows Active Directory Group for each type of User that you would have in halFILE. For example, if I have Search only users, Search and Index users and Admin users, I would set up 3 Active Directory Groups as follows:
- HFAD_User_Search – for users with Search only privileges.
- HFAD_User_Index – for users with Search and Index privileges.
- HFAD_User_Admin – for users with Admin privileges.
- Add the Network users into the appropriate HFAD_User group(s).
- Set up a Windows Active Directory Group for each type of Custom Search you require. For example, if you have a Custom Search for Public users and a second Custom Search profile for Employees, then you would set up the Active Directory Groups as follows:
- HFAD_Search_Public
- HFAD_Search_Employee
- Add the Network users into the appropriate HFAD_Search group(s).
- Change halFILE to use Active Directory Integration. In the Administrator, this is under Tools-Options / Security/Versions tab. Check the "Use Active Directory Integration" box. Note: You must check the "Use halFILE Integrated Security" box to enable this check box.
- Set up a single User and Custom Search in halFILE for each Windows Active Directory Group, using the same name as the Windows Active Directory Group. So using the above examples, set up users named HFAD_User_Search, HFAD_User_Index and HFAD_User_Admin. Set up all the features as needed including User Parameter Settings and Group/Document Level Security. Then, set up Custom Search Profiles named HFAD_Search_Public and HFAD_Search_Employee.
- Now, when a user goes into halFILE, they are automatically assigned their Network user id. halFILE looks up the user id in the Windows Active Directory Groups to determine which groups the user belongs to. Then, the user's profile for halFILE security is created for the user.
halFILE Active Directory Integration
Once the setup is complete, you should run HFWAD32.EXE to login to halFILE using Windows Active Directory Integration. This program determines what groups the user belongs to and set up the halFILE security privileges accordingly. Then it continues on to the halFILE Manager (halfile.exe).
e.halFILE Active Directory Integration
e.halFILE uses the same security setup as halFILE. However, there are some special set up requirements in Microsoft Internet Information Services (IIS) that need to be configured as follows:
- Create a folder under the ehalfile folder named Login and copy hflogin.asp, hflogin.dll and halweb.ini into this folder. You will need to register hflogin.dll.
- Create a virtual directory called "login" in your website and set Directory Security to disable Anonymous Access and enable Integrated Windows Authentication behind the Directory Security tab.
- Change the login button or link on your website to go to …/login/hflogin.asp. This will ask the user to login to Windows and perform the halFILE Active Directory authentication before proceeding with the next web page.
Active Directory Integration - Behind the Scenes
New tables in the HFWParams database are used to store the above information including:
ADUsers ADUserFeatures ADCustomSearch
When a user logs in, halFILE queries Windows Active Directory to determine which Active Directory Groups he/she belongs and dynamically builds the security system for that user in halFILE according to the settings for matching group names set up in halFILE.

